Build a 2D Robotic Car!
Published:
In the last blog post I explained what is a particle filter and how we can build one using pygame and python.In this post, I will walk you through the steps to build a 2D robotic car and get it running using PD control.
I am building visual demonstration of the problems given in Udacity’s Course on Artificial Intelligence for Robotics.You can find the implementation code here.
Bicycle Model
Our robotic car has two fixed rear wheels and two front steereable wheels.The vehicle motion can be explained by splitting the vehicle vertically so that we get something called a bicycle model as shown below.
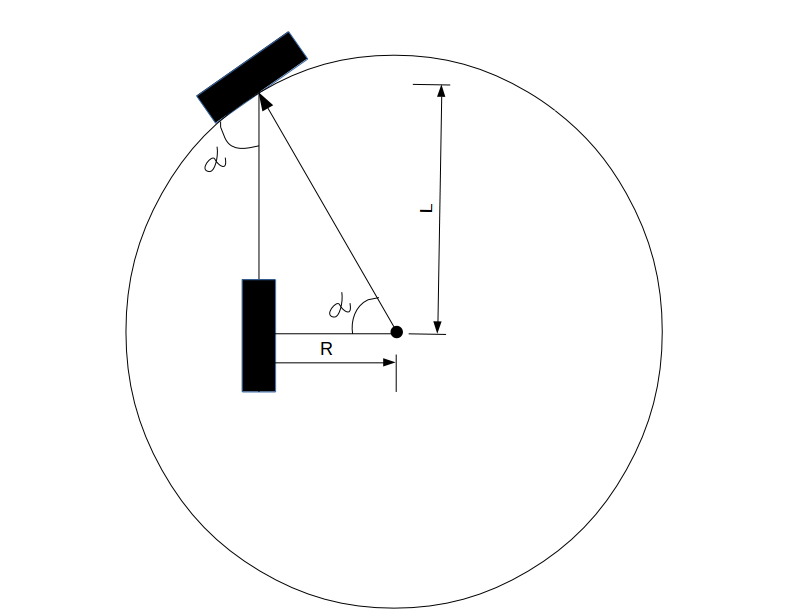
Bicycle model - local coordinates
This model is useful in understanding the vehicle motion especially when taking a turn.Let’s say our car starts to take a right turn. Assuming the steering angle to be alpha, the radius of the circle that the rear wheel makes while taking the turn to be R, and the distance between the front and rear wheel be L.Then the radius R can be clearly stated as follows.
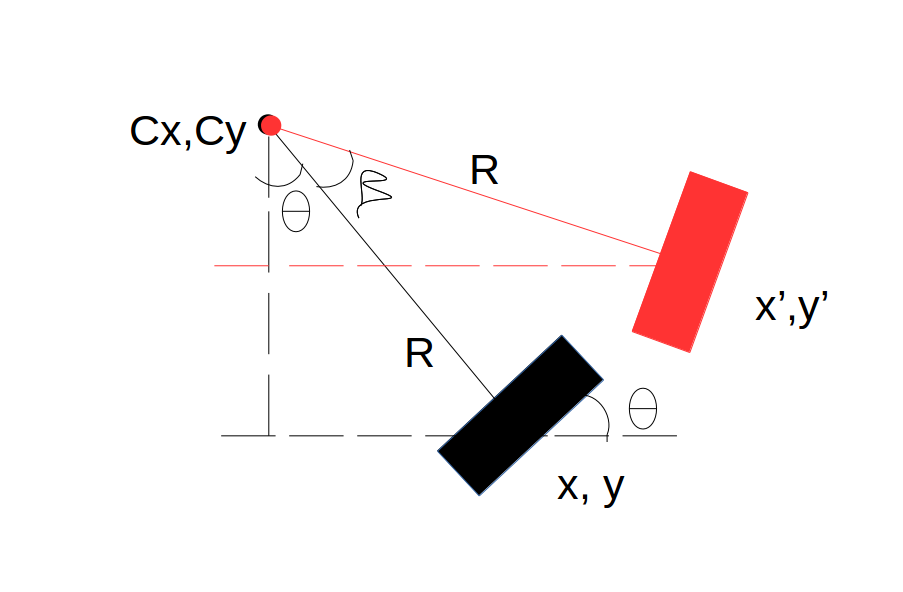
Bicycle model - global coordinates
	def cte(self, radius):
			cte = 0
			x, y, orientation = self.x, self.y, self.orientation
			if x <= 250:
				dx = x - 250
				dy = y - 400
				cte = sqrt(dx**2+dy**2) - 200
			elif 250 < x and x < 550:
				if (0 <= orientation and orientation < pi/2) or \
				(3 * pi / 2 < orientation and orientation < 2 * pi):
					cte = -(y - 200)
				else:
				    cte = (y - 600)
			else:
				dx = x - 550
				dy = y - 400
				cte = sqrt(dx**2+dy**2) - 200
			return cte
PD Controller
The PD Controller adjusts the steering angle by doing two very intuitive things.If the car is very far from the reference line, the steering angle should be very high.Also, the CTE will be very high.This means, that the steering angle is proportional to the CTE.Now, the only thing the car is basing its value of steering angle is the CTE.It might happen that the value of steering angle is more than required and it overshoots.How would the car know it is nearing the reference line? One way to do is by adding a derivative term in the controller.This will keep the track of how fast the CTE is changing.If there is not much change, the derivative value will be less and it would mean that the car is near the reference line. The value of steering angle then would be small.steering_angle = - 0.1 * crosstrack_error - 0.5 * diff_crosstrack_errorCar body
The car body is a 80px by 60px yellow trianlge with four 20px by 6px wheels.In the last blog post I had used a car sprite for demonstrating the particle filter localization.It was pretty easy because image rotation method is available in pygame.But rectangle rotation is not available.So I decided to write my own method for rectangle rotation.The method draw_rect() takes four arguments center, corners, rotation_angle and color.The center is center of the rectangle, corners is a list of the position of 4 corners before rotation, rotation_angle is the angle by which the rectangle will rotate. def draw_rect(center, corners, rotation_angle, color):
c_x = center[0]
c_y = center[1]
delta_angle = rotation_angle
rotated_corners = []
for p in corners:
temp = []
length = sqrt((p[0] - c_x)**2 + (c_y - p[1])**2)
angle = atan2(c_y - p[1], p[0] - c_x)
angle += delta_angle
temp.append(c_x + length*cos(angle))
temp.append(c_y - length*sin(angle))
rotated_corners.append(temp)
# draw rectangular polygon --> car body
rect = pygame.draw.polygon(screen, color,\
(rotated_corners[0],rotated_corners[1],rotated_corners[2],\
rotated_corners[3]))The method iterates through all the four corners and calculates the length of each from the center.And using atan2, gets the angle between center and the corner before rotation.Then the rotation angle delta_angle is added to this.The new position is calculated using simple trigonotmetry equations as shown above.
I was specially interested in implementing this method because I wanted to see steering wheels in action.In wheel motion, there are three angles involved.Let's take just one steering wheel.First we must know the new center of the wheel after rotation.We get this by rotating the current center of the wheel by orientation angle.Then using this newly found center, we draw four corners of the wheel (aligned in +x direction).We call draw_rect() using newly found center and the corners.We find the angle between each corner and the new center of the wheel.Next we rotate the corners by steering angle to get final positon of each corner of the wheel.
You can find the implementation code and the racetrack image that I have used here.I hope you found this post helpful.Until next time!
Robotic car in motion! Observe how PD control is acting on steering wheels.